Rice Milk Ranch Dressing
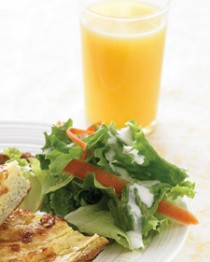
 Rice Milk Ranch Dressing (Allergy-Free and Vegan too!)
First order of business, to see the winner of the Free For All Cooking cookbook giveaway, please see the video drawing here: Free For All Cooking Giveaway. Thank you all for your participation and enthusiasm! Congrats to the winner!
Now, on to the food! Is your kid a dunker or a dipper? Do veggies need to be disguised as the vehicle by which the dip or dressing is transported to the mouth? Then this Allergy-Free Gluten-Free Ranch Dressing is the perfect ruse for you!
Allergy Free Thanksgiving Tips and Recipes
 Delicious, Allergen-Free Turkey Day
On Thanksgiving, we gather and we eat for upwards of four hours, all the way from pre-dinner snacks to post-dessert dessert. But a traditional Thanksgiving dinner is literally one of the most allergen-laden meals possible.Whether this is your first allergen-free Thanksgiving or your twentieth, the following tips will help make it festive, mouthwateringly delicious, and safe.
Talking Turkey:
Did you know that many fresh and frozen turkeys contain hidden allergens? Most conventional, “self-basted” turkeys have been injected with butter, water and salt, and may also contain gluten. If you’re going to go the conventional turkey route, always verify ingredients with the manufacturer before purchasing. A safer option is a “Natural” turkey, which hasn’t been treated with any artificial colors or flavor enhancing ingredients. Look for “Organic” natural turkeys at websites like Local Harvest, or stores like Whole Foods.
Another good option: natural “Kosher” turkey. Guaranteed to have no dairy injected, the benefit of a Kosher turkey is that it has already been salted, and thus doesn’t need brining. I recommend Empire, the taste test winner selected by Cook’s Illustrated Magazine. Empire turkeys are also gluten-free. If you’re a die-hard foodie, take the adventurous (albeit, most expensive) route and look for a “Heritage” turkey, which is one of the pre-World War II breeds of turkey, like Narragansett and Bourbon Red. Slow Food has a great listing of independent farmers raising Heritage turkeys, state by state. Looking for something similar to what our forefathers might have eaten? Save yourself the hunt, check out D’Artagnan, to purchase a wild bird.
Last, to keep your turkey allergen-free, baste with olive oil. There is no need for butter, and in fact I prefer turkey with olive oil.
Savory Side Dishes:
Make baked sweet potato and potato dishes using canola oil instead of butter, and orange juice or rice milk instead of milk or cream. I prefer yams/sweet potatoes without marshmallows, but if like them, look for Allerenergy marshmallows, or try vegan brands like VeganSweets, made without eggs or gelatin, but be forewarned that they contain the allergen SOY. Instead of plain rice, mix and match with old world gluten-free grains like quinoa, millet, brown rice, wild rice, and buckwheat. All of these combine well with legumes like lentils or chickpeas, and are wonderful when enhanced with fresh herbs like thyme and sage. Dip into the plentiful array of winter squash available this time of year–not just butternut and acorn, but delicata, red kuri, and sweet dumplings.
Gravy can be made with olive oil instead of butter, and alternate flours, such as brown rice flour for thickening, instead of traditional wheat flour. See my recipe for Allergy-Friendly Gravy below.
Try making roast brussel sprouts this year instead of drenching them in butter or hollandaise sauce. To roast, cook at 450 degrees on a baking tray, tossed in olive oil and sprinkled with kosher salt and pepper, for 25 minutes, shaking once or twice until a crispy golden brown on the outside, and tender on the inside.
For cranberry sauce, omit walnuts (tree nuts), and use thinly sliced tangerines or mandarin oranges, keeping the rind on, to add texture and color.
 For Pie, check out my cookbook, The Allergen-Free Baker’s Handbook for any number of wonderful allergen-free pie, crumble, and crisp recipes, from Pumpkin Pie, to Apple Cranberry Pie. Or see my new Allergy-Friendly Sweet Potato Pie recipe.
Remember: if you’re only doing a few allergen-free dishes rather than a whole allergy-friendly meal, be aware of cross contamination and cross contact while cooking and serving. Consider labeling dishes with ingredient cards. If the meal is going to be served buffet-style, serve the food allergic person first to avoid cross contamination.
Allergy-Friendly (Gluten-Free) Cornbread and Wild Mushroom Stuffing
Serves 4-6.
This stuffing can be made vegan or non-vegan, depending on personal preference. Either way, it is rich-tasting, exotic, healthy, and delicious.
- 3 cups allergen-free cornbread (my recipe follows), preferably stale so it’s dried out a bit
- 1/2 cup diced nitrite-free pancetta (optional, omit if making vegan — otherwise, look for artisanal brands at stores like Whole Foods)
- 4 Tbsp. olive oil
- 5 large shallots (both halves), minced fine
- 2 large stalks celery, chopped into 1/4-inch pieces
- 1/2 lb. wild mushrooms (I like shiitake, but you could also use chanterelles or morels, quartered, or cut into eighths if very large)
- 1 tsp. fresh thyme, chopped
- 1 tsp. fresh rosemary, chopped
- 1/4 tsp. kosher salt
- 1/4 tsp. pepper
- 1/4 cup white wine
- 1/4 cup rice milk
- 1/3 cup chicken broth (or vegetable broth if making vegan — Kitchen Basics is Allergen-Free
1. Preheat oven to 350 degrees. Cut cornbread into 1-inch-thick slices and place on baking sheet. Bake until golden brown and dried out a bit, about 10-15 minutes, turning the slices once. Keep a close eye on it, because you don’t want it to burn. Remove from oven and let cool.
2. Heat a heavy skillet over medium-high heat. Once pan is really hot, add the pancetta and cook until crispy.Remove pancetta from pan and set aside. (Skip this step if making vegan).
3. Add olive oil to skillet, then shallots and celery. Cook, stirring occasionally, until soft, about 3 minutes. Add the mushrooms, thyme, rosemary, salt and pepper. Cook, stirring occasionally, until slightly soft, about 4 minutes. Add white wine and cook, stirring until it’s been absorbed, about 1 or 2 minutes. Add rice milk and cook about 1 minute more. Remove pan from heat.
4. Crumble the cornbread and measure out 3 heaping cups. Add to the pan. Add the crispy pancetta bits (if using). Toss gently. Oil a 9×13-inch pan (or whatever you’ve got that’s comparable) with olive oil. Spoon in the stuffing and drizzle with chicken broth or vegetable broth. Bake at 350 degrees until crusty and golden brown, about 30 minutes.
Allergy-Friendly Cornbread and Wild Mushroom Stuffing
© 2010 by Cybele Pascal
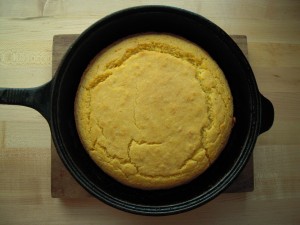
Allergy-Friendly (Gluten-Free) Skillet Cornbread
Serves 8
Cooking cornbread in a hot cast iron skillet gives it that coveted crust on the outside. This cornbread tastes just like my Southern grandmothers’, but it’s vegan, allergen-free, and gluten-free! Make it for the holidays, or any old time!
- 1 cup King Arthur Gluten Free Multi-Purpose Flour, or Authentic Foods GF Classical Blend, or my Basic Gluten-free Flour Mix )
- 3/4 cup yellow cornmeal
- 1/2 tsp. xanthan gum
- 1/4 tsp. salt
- 2 tsp. baking powder
- 3/4 tsp. baking soda
- 1 3/4 cups rice milk
- 2 Tbsp. lemon juice
- 2 tsp. honey
- 3 tsp. Ener-G egg replacer mixed with 4 Tbsp. rice milk
- 1/4 cup canola oil
1. Preheat oven to 400 degrees. Preheat the pan, along with your oven, this will give you a nice crust. I use a 10-inch cast iron skillet (the traditional way), but you may also use a similarly sized baking pan, square or round, it doesn’t matter.
2. Combine flour mix, cornmeal, xanthan gum, salt, baking powder, and baking soda.
3. Combine rice milk, lemon juice, and honey. Whisk well. Set aside for 10 minutes. Combine egg replacer with rice milk. Add rice milk/lemon juice mixture to flour mixture, along with egg replacer and canola oil. Beat until smooth.
4. Remove hot pan from oven and quickly spray with canola oil spray or other oil of choice. Pour in batter and set pan in center of oven. Bake 25 minutes at 400 degrees, then turn heat down to 300 degrees and bake another 10 minutes or so until set in the center. Remove from oven. Let cool about 15 minutes before slicing into squares or pie-shaped wedges.
Allergy-Friendly Skillet Cornbread
© 2010 by Cybele Pascal
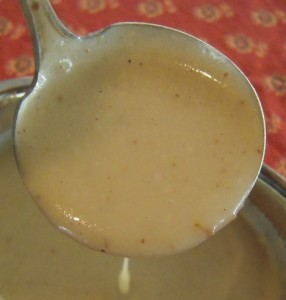
 Allergy-Friendly (Gluten-Free) Creamy Gravy
Makes 1 1/4 cups
Gravy is one of those things that everybody loves. Even the thought of gravy can make you smile. In fact, the term gravy, in slang, means happiness, stable goodness, and a state of complacency.Gravy also means cool, okay, and all good, as in “It’s all gravy, baby”. If something is better than gravy, it’s gravy on eggos or gravy on rice. Who doesn’t want some of that coolness poured onto their plate?
But beloved gravy is also highly allergenic. Yup, it’s loaded with no-nos for those with food allergies. Butter (dairy), wheat (gluten), and cream/milk (dairy again). It’s also often chock-full of soy derivatives.So I took on the challenge to convert beloved gravy into something allergy-friendly. Just pour this yummy goodness over rice, potatoes, turkey breast, or do like me, and eat it with a spoon!
Ingredients:
- 1/4 cup canola oil
- 1/4 cup fine brown rice flour
- 1/8 teaspoon onion powder
- pinch of dried thyme
- pinch of cayenne pepper
- salt and freshly ground pepper
- 1 cup warm beef (or chicken or turkey) broth or stock (Kitchen Basics is allergy-friendly)
- 1/2 cup warm rice milk
1. Heat canola oil in heavy pot over medium-high heat.
2. Add brown rice flour, 1 tablespoon at a time, and cook, stirring constantly with a wooden spoon, 2 minutes, until golden and aromatic.
3. Add onion powder, pinch of thyme, pinch of cayenne pepper, pinch of salt, and a couple turns of freshly ground pepper. Cook about 1 minute more, stirring.
4. Reduce heat to medium. Using a whisk, whisk in the warm beef broth, in three batches. Whisk vigorously, to smooth out any lumps. Add warm rice milk, whisking, and bring to a simmer. Cook stirring often, until thick and creamy. Adjust salt and pepper to taste. Serve warm.
Allergy-Friendly, Gluten-Free Creamy Gravy
© 2010 by Cybele Pascal
(Please note that all my recipes are completely free of all top allergens (wheat, dairy, soy, eggs, peanuts, tree nuts, sesame, fish, shellfish, and gluten), so as many people as possible can enjoy them. Additionally, all the ingredients are available at Whole Foods, and online at Amazon.com. If you have trouble finding something, let me know and I’ll help you find it.)
SAFETY NOTE: Because each person’s food sensitivity and reaction is unique, ranging from mild intolerance to life-threatening and severe food allergies, it is up to the consumer to monitor ingredients and manufacturing conditions. If manufacturing conditions, potential cross contact between foods, and ingredient derivatives pose a risk for you, please re-read all food labels and call the manufacturer to confirm potential allergen concerns beforeconsumption. Ingredients and manufacturing practices can change overnight and without warning.
Rice Milk Mayonnaise
 Rice Milk Mayonnaise (Egg-Free, Soy-Free, Dairy-Free, Vegan)
It’s back-to-school time, and in my house, that means “sandwiches”. What’s key to most sandwiches? Mayonnaise. But what do you do if you can’t eat eggs, soy, or even dairy? Make it yourself!
I wasn’t sure this recipe could be successfully done, without some form of protein to help emulsify the mayonnaise. Eggs are generally key to helping bind mayonnaise and aioli, and vegan mayo always seems to contain soy, so it must be there for a reason, right? Would I really be able to get a true eggy-like creamy mayonnaise without eggs, dairy, or soy? In my uncertainty, I turned to the God of all things kitchen, David Lebovitz. I thought if anyone could do egg-free, soy-free mayo, it would be him, and I was right. To my delight, I found that just a couple months ago, he’d blogged about an egg-free mayonnaise based upon a Portuguese recipe, using milk instead of eggs. But still, to my chagrin, this didn’t solve my protein problem. I needed to create a recipe that was dairy-free too. I pondered using Hemp milk, which has a fair amount of protein, but it can be rather “ropey” in flavor, and we don’t want that in our mayo. I settled on using rice milk, but that still didn’t solve the protein problem. And then, I remembered my old friend Xanthan Gum. A “thickener”, an “emulsifier” … Bingo! I was delighted, in fact, overjoyed to discover that you can make Egg-free, Soy-free, Dairy-free Mayonnaise, in all of about 5 minutes. The following recipe was inspired by David Lebovitz’s recipe for Eggless Chervil Mayonnaise which is an adaptation of a recipe from Leite’sCulinaria and The New Portuguese Table (Clarkson Potter) by David Leite. I really hope I got that accreditation right!
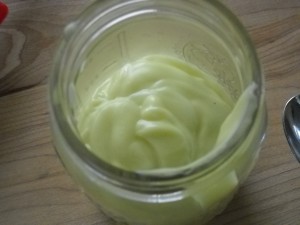
Rice Milk Mayonnaise (Egg-free, Soy-free, and Dairy-free)
Makes about 1 cup
The real trick to this recipe is the medicine dropper. I’m a mother of two young children, so this little tool is readily on hand. To emulsify the mayonnaise properly, you must drip the oil in a drop at a time, or it won’t work. The best way to control the flow, is with a dropper. It will take you a few minutes to get all that oil in the blender a drop at a time, but don’t be tempted to rush it. Your patience will pay off with perfection. Who would have thought it possible? Egg-free, dairy-free, and soy-free, but still with a lovely buttercup hue and the lush creaminess we love in fresh mayonnaise. Feel free to add fresh herbs at the end, or to use all canola oil, for a milder flavor.
Ingredients:
- 1/3 cup cold rice milk
- 1 1/2 teaspoons freshly squeezed lemon juice
- 1/8th teaspoon ground white pepper
- 1 small clove of garlic
- 1/4 teaspoon xanthan gum
- 1/4 cup + 2 Tablespoons Olive Oil (or use all canola oil, 3/4 cup total, for a milder flavor)
- 1/4 cup + 2 Tablespoons canola oil
- 1/2 teaspoon fine sea salt
1. Combine the rice milk with the lemon juice and white pepper in a blender. Don’t use a food processor for this, use a blender. Using a garlic press, add the garlic. Add the xanthan gum, and mix on high speed until foamy.
2. Set the blender on high, and using the medicine dropper, add the oil, drop by drop, through the hole in the lid of the blender, until the mayonnaise begins to emulsify. You may wish to use your other hand to cover most of the hole in the lid, to prevent splattering. This is not a recipe for the impatient. Take your time! Continue to add the oil, in a steady drip, until the mayonnaise is thick and creamy, scraping down sides of blender as necessary. (I turned my cheap old blender off several times to let it cool down while making this. You may also wish to take pauses). Again, do not try to make this too quickly; the process of slowing incorporating the oil should take several minutes.
3. Add the salt, taste, and adjust salt and lemon juice if desired.
4. Serve at room temperature. Transfer remaining mayonnaise to a jar, and store tightly covered, in the refrigerator for up to one week.
Rice Milk Mayonnaise Copyright © 2010 by Cybele Pascal
(Please note that all my recipes are completely free of all top allergens (wheat, dairy, soy, eggs, peanuts, tree nuts, sesame, fish, shellfish, and gluten), so as many people as possible can enjoy them. Additionally, all the ingredients are available at Whole Foods, and online at Amazon.com. If you have trouble finding something, let me know and I’ll help you find it.)
SAFETY NOTE: Because each person’s food sensitivity and reaction is unique, ranging from mild intolerance to life-threatening and severe food allergies, it is up to the consumer to monitor ingredients and manufacturing conditions. If manufacturing conditions, potential cross contact between foods, and ingredient derivatives pose a risk for you, please re-read all food labels and call the manufacturer to confirm potential allergen concerns BEFORE consumption. Ingredients and manufacturing practices can change overnight and without warning.