BFree Gluten Free Breads
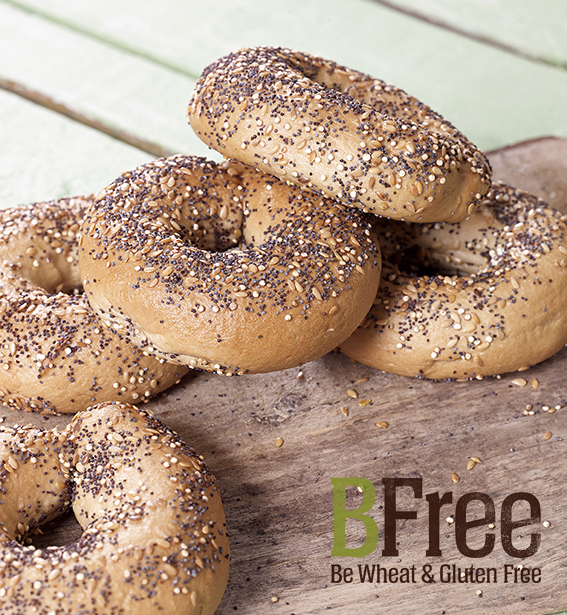
BFree Multiseed Bagels
Before anything, I want to get one thing off my chest. I have not posted on this blog in OVER A YEAR. I can’t rightly keep blogger in my bio anymore. But that doesn’t mean I haven’t been thinking about it, or wanting to. It just means, I am plum out of time. (Shame, embarrassment, guilt, and imposter syndrome slightly expunged). So now, onto the good stuff! The stuff that’s bringing me back to post. Bread. That’s right, BREAD! There are very few things in life that I love as much or more than bread. My kids, my husband, my dog, my cat… well, maybe not my cat. Don’t tell her. She’ll develop a bread complex.
However, finding gluten-free bread has been quite a challenge over the years, and finding allergy-friendly, gluten-free bread has been like seeking the Holy Grail. There is some good bread out there (Canyon Bakehouse), but it’s not easy to find and it’s expensive. There is a good Gluten-free bakery in LA, Rising Hearts Bakery, but I have to get in my car and drive there specifically for bread. Because the bread at my local grocery store just doesn’t cut it. You KNOW what I’m talking about. Dense, rocks, dry, too much yeast, bread that’s like foam or worse, styrofoam. Bread with too much xanthan gum or guar gum, that has a slimy gummy finish. It’s often been, well, just not worth it to bother. And I do have bread recipes of my own, (see my Pita), and I like some of the bread mixes out there (Luce’s bread is divine and crusty), but I am a very busy working mom and making bread from scratch or even from a mix is not in the cards most days of the week. Plus, I don’t own a bread machine. (First World Problems).
For many years, I thought I’d tackle this frontier. I’d launch bread products. Rolls, sandwich bread, pita, tortillas, maybe even bagels. However, my Cybele’s Free-to-Eat cookies have kept me occupied for more years than I ever anticipated and more years than I like to admit. Additionally, the challenges of bread and its short shelf life were daunting to me.
I’d all but given up on good bread and had settled on the passible gluten-free bread at Trader Joe’s.
I didn’t even know there was anything else out there. Until a pot of gold from the end of the rainbow in Ireland landed on my doorstep. Say what? A heaven-sent basket of bread. (Okay, it came in a cool shipper packed in dry ice, but to me it looked like it had angels singing and the wafting steam of fresh baked bread rising out of a homey tea towel.) I really said “Score!” as I opened it. There was sandwich bread, multigrain sandwich bread, hot dog rolls, dinner rolls, bagels, wraps in two flavors, and pita bread. To a bread starved free-from eater, this is truly manna from Heaven.
And I have eaten all of it. Yup, I ate it all. I shared a little bit with my family, but I hid some of it in the back of the freezer for myself. And by the way, the freezer is where they recommend you store their products if they aren’t being eaten immediately.
BFree Soft White Rolls
My takeaway? My favorite were the dinner rolls, crusty on the outside, chewy on the inside, without any weird aftertaste or gumminess. Second favorite, the sandwich bread, both white and multigrain. And third, the Pita bread, which is the perfect size for a sandwich. Usually, one needs to cut the pita in half for the sandwich, and it breaks and splits and is hard to stuff. Not so with theirs – it’s the perfect size to begin with. Bravo, BFree!
For more info:
About BFree Foods
Based out of Dublin, Ireland and manufacturing for the U.S. market in Montebello, California, BFree Foods is an innovator in the wheat and gluten-free bread product category. Passionately dedicated to providing exceptional taste, nutrition profiles and performance, BFree’s wraps, rolls, bread loaves, bagels and pita breads maintain the texture of traditional bread products but are free from gluten, wheat, dairy, egg, nuts and soy. All BFree products are allergen and vegan-friendly, low-fat and high- fiber, making them ideal for health-conscious consumers across the globe. For additional information, visit US.BFreeFoods.com or find the brand on Facebook, Twitter, Instagram and YouTube.
Old Fashioned Strawberry Tart
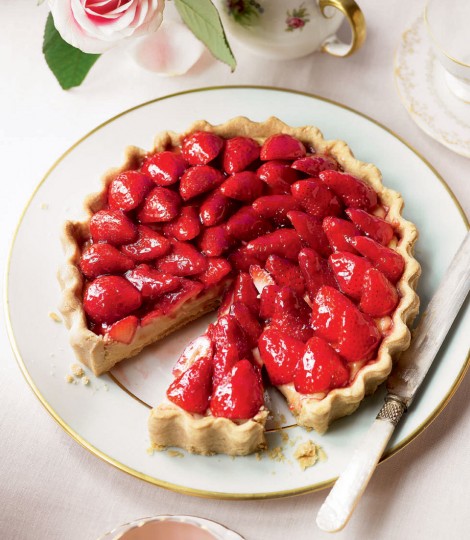
Old-Fashioned Strawberry Tart
Makes 9½-inch tart
Free From gluten and all top 8 allergens
This beautiful tart disappears in only a few hours at my house; it’s that good. Nobody would ever guess it’s gluten-free and allergy-friendly. Look for small sweet fresh strawberries at your local farmers’ market and use fresh squeezed orange juice for the biggest burst of flavor. To make sure every last bit of the juicy filling makes it into your tart, I highly recommend using a rubber spatula when transferring the sauce and jam.
Shortbread Tart Crust
1 1/2 cups my Basic Gluten-Free Flour Mix, or Authentic Foods GF Classical Blend
¼ cup + 2 tbsp confectioners’ sugar
¾ tsp xanthan gum
⅛ tsp salt
10 tbsp dairy-free soy-free vegetable shortening
1-2 tbsp orange juice (see instructions)
Strawberry Filling
5 cups hulled/de-stemmed strawberries, 1 cup sliced, 4 cups halved
½ cup granulated sugar
1½ tbsp cornstarch
1 tbsp orange juice
¾ tsp unflavored gelatin or vegan gel
Pinch salt
1 tsp pure vanilla extract
¼ cup plus 1 tbsp strawberry jam, divided
1 Preheat the oven to 350°F. Lightly grease a 9½-inch tart pan with removable bottom.
2. In bowl of a stand mixer with paddle attachment, sift together flour mix, confectioners’ sugar, xanthan gum, and salt. Add shortening (be very exact about this measurement) in tablespoon-sized pieces. Mix on medium speed to create a coarse meal, about 1 minute.
3. Add orange juice (1 tablespoon if using classic vegetable shortening, 2 tablespoons with palm shortening) and mix until dough begins to ball in the center, about 20 seconds. It should be the texture of soft new play dough.
4. Turn out dough onto a sheet of parchment or waxed paper and form into a ball. Top with another sheet of parchment or waxed paper, flatten into a disk and roll out to make a ¼-inch thick circle, 1 inch wider than your tart pan.
5. Remove top sheet of paper, flip crust into prepared tart pan and press down with the palm of your hand. Gently peel off remaining sheet of paper and finish pressing in dough, patching the sides or any breakages as necessary. Trim by running a rolling pin over top of the tart pan. Prick dough with a fork 8 times.
6. Bake crust for 20 minutes, or until set and very lightly golden. If it puffs up while baking, prick crust a couple more times. Let cool on a wire rack.
7. While crust is cooling, make strawberry sauce for filling. Puree 1 cup sliced strawberries in a blender until liquefied. Add granulated sugar, cornstarch, 1 tablespoon orange juice, gelatin and salt, and puree until smooth.
8. Transfer strawberry sauce to a small saucepan and stir in vanilla. Bring to a boil over medium heat while stirring continuously with a wooden spoon. Reduce heat to low, cook and stir for 1 minute, or until thickened like pudding. Transfer to a bowl and let cool to lukewarm (not cold), stirring a few times to help the process.
9. Warm jam over low heat in a small saucepan or in the microwave, stirring vigorously to thin. Using a pastry brush spread a thin layer of the jam on crust bottom. Chill crust in refrigerator for 10 minutes.
10. Gently combine 4 cups halved strawberries with remaining strawberry jam in a large bowl. Add lukewarm strawberry sauce and lightly toss until the strawberries are well-coated. Transfer filling to the cooled tart crust, evenly distributing strawberries.
11. Chill in refrigerator for 2 hours before serving. This pie is best served the day of, but it is also excellent the next day. Optionally, top each slice with your whipped topping of choice.
Old-Fashioned Strawberry Tart © 2014 by Cybele Pascal
This recipe first appeared in the Spring 2014 issue of Allergic Living Magazine
Allergy Friendly Chocolate Cherry Cheesecake Squares
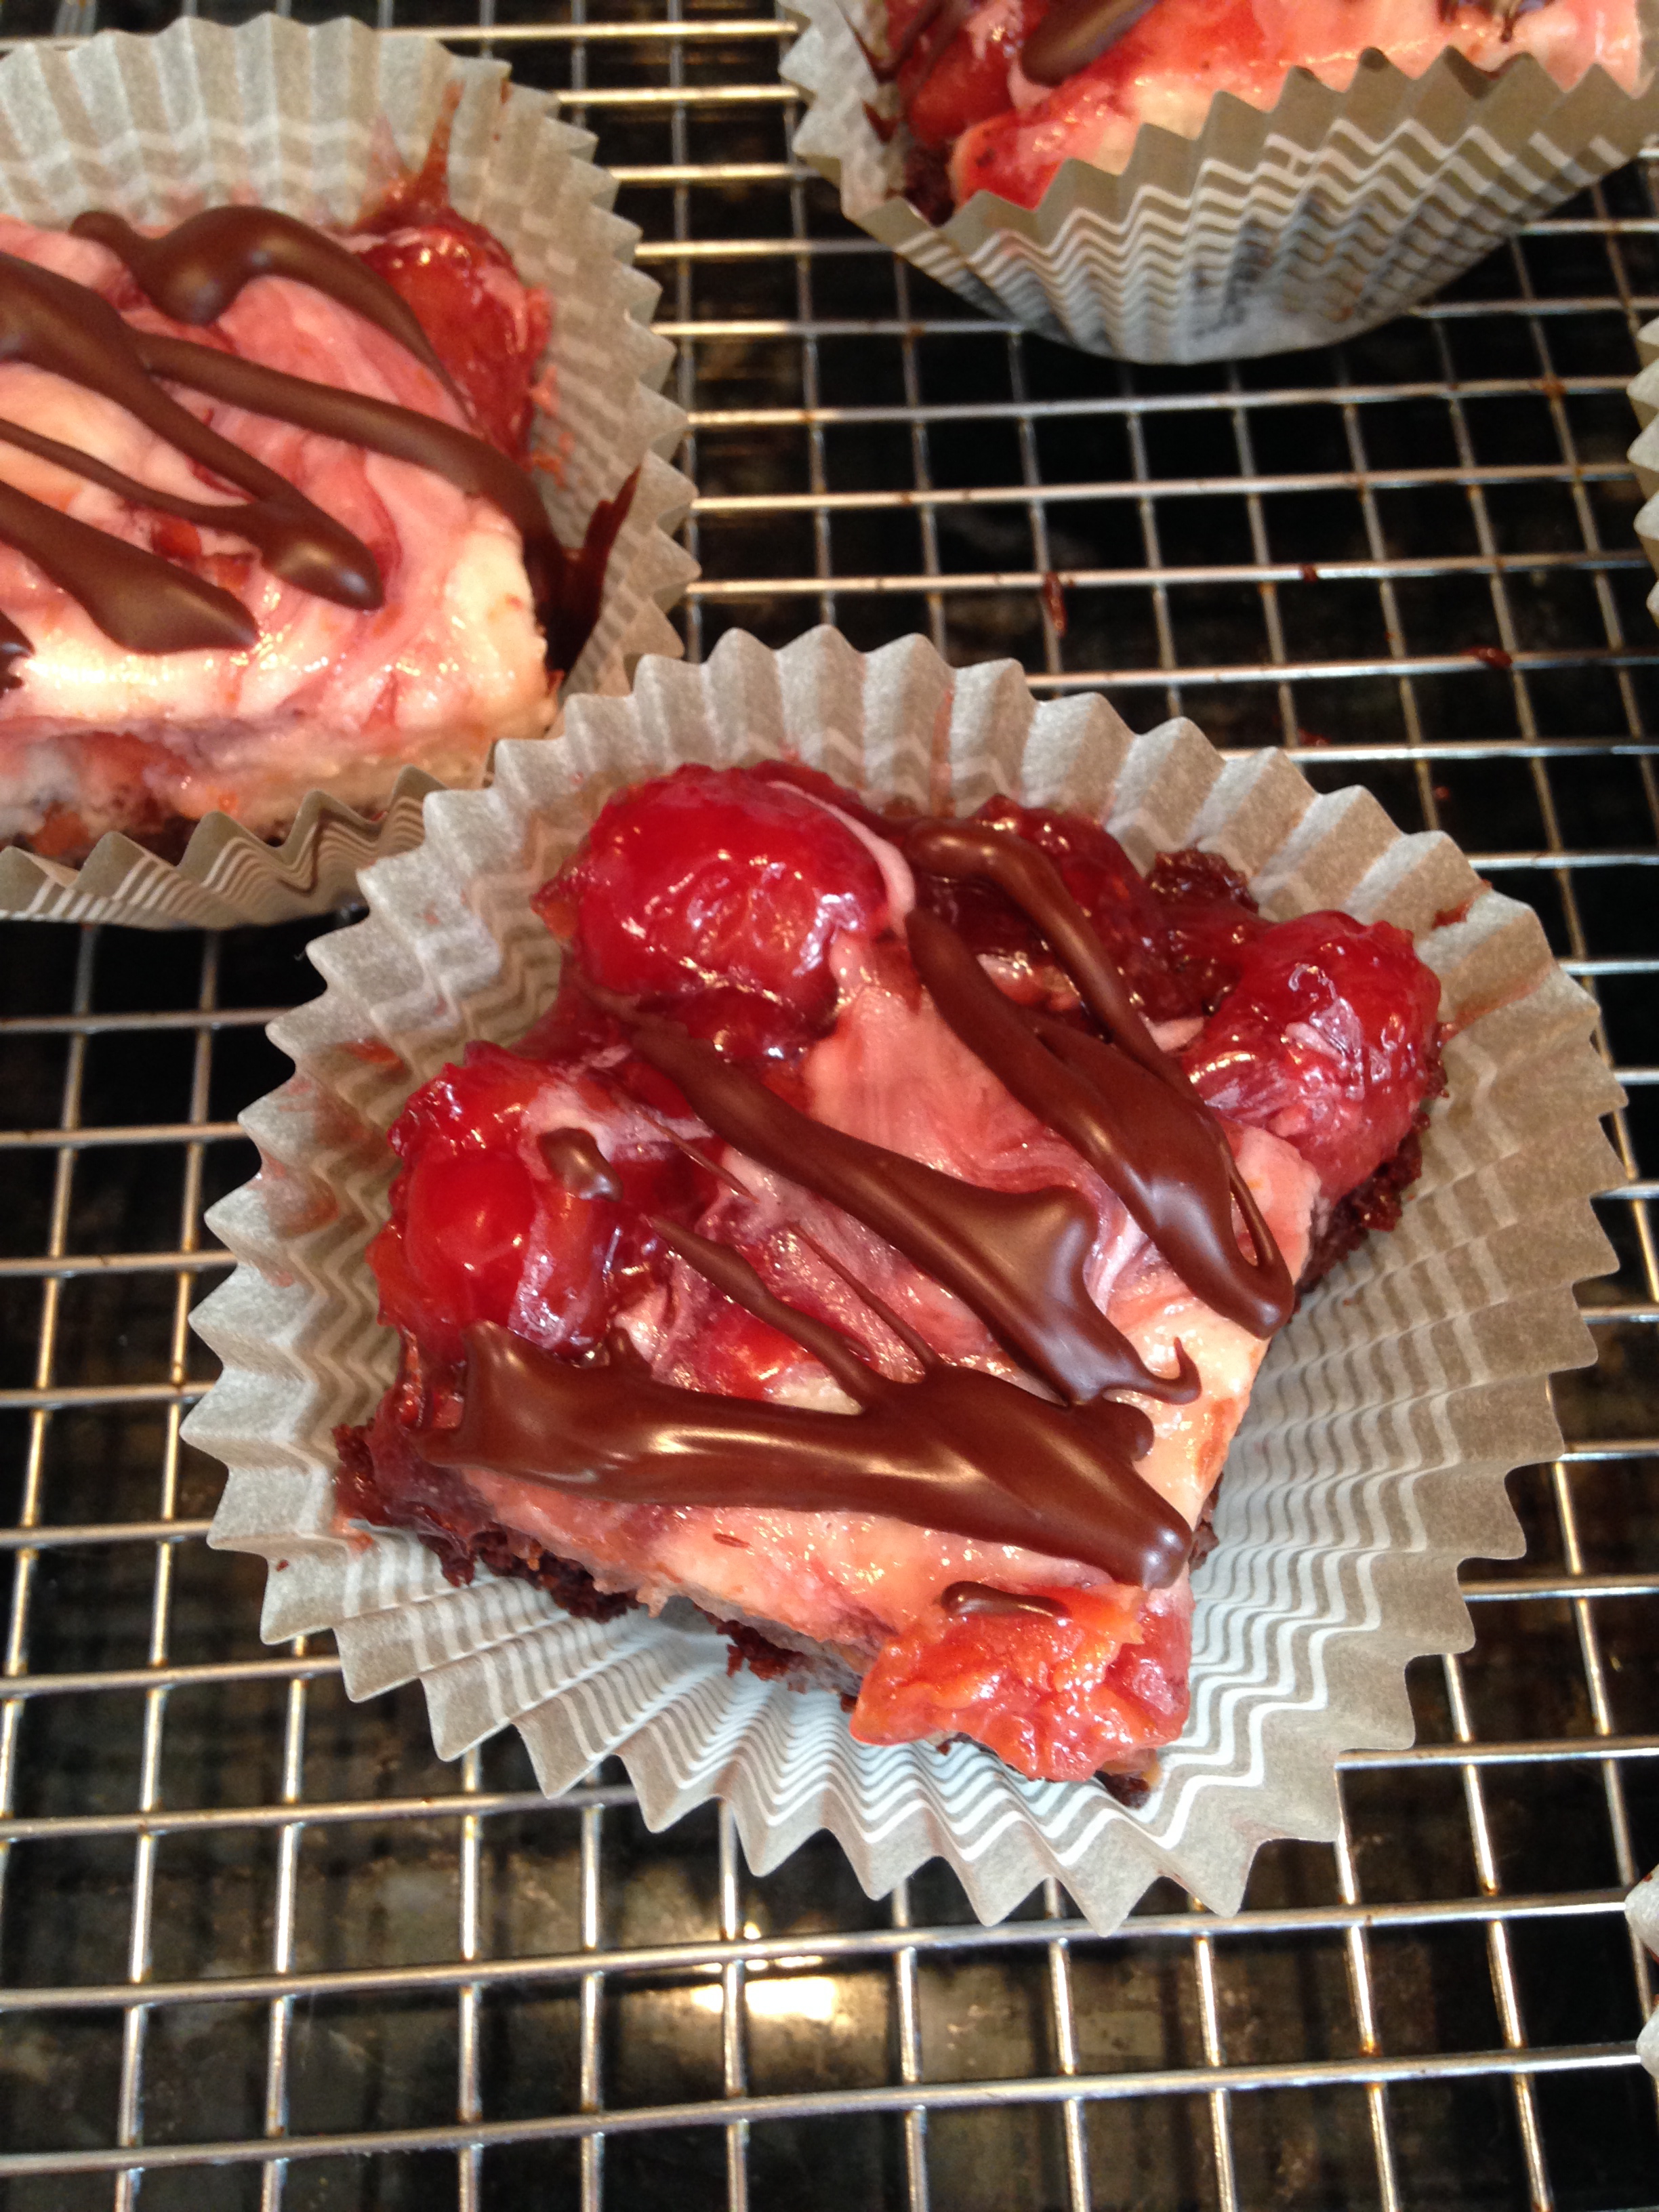
Chocolate Cherry Cheesecake Squares
Rich, decadent and flavorful, this hybrid dessert takes dairy-free indulgence to a whole new level. Thank you, Daiya, you’ve made the world a better place with your vegan dairy-free cheeses!
Makes 16 squares
Free From: gluten and all top allergens
Chocolate Layer Ingredients
½ cup + 4 tbsp dairy-free milk alternative (such as rice milk), divided
1½ tsp powdered egg replacer (such as Ener-G)
1¼ cups my Basic Gluten-Free Flour Mix or Authentic Foods GF Classical Blend
1¼ cups sugar
½ cup + 2 tbsp cocoa powder
1¼ tsp baking soda
⅝ tsp double-acting baking powder
⅝ tsp salt
½ tsp xanthan gum
½ cup + 2 tbsp warm water
¼ cup + 1 tbsp canola oil
¾ tsp vanilla extract
Cherry Cheesecake Layer Ingredients
2 tbsp dairy-free milk alternative (such as rice milk)
1½ tsp powdered egg replacer (such as Ener-G)
4 oz dairy-free, soy-free plain cream cheese alternative (such as Daiya)
2 tbsp dairy-free soy-free vegetable shortening
2 tbsp + 2 tsp sugar
1 tbsp my Basic Gluten-Free Flour Mix or Authentic Foods GF Classical Blend
⅜ tsp vanilla extract
1¼ cups cherry pie filling
Chocolate Drizzle
¼ cup allergen-free semi-sweet chocolate chips
1 tsp dairy-free soy-free vegetable shortening
1. Preheat oven to 350° F. Line a 9-inch baking pan with foil, extending ends over sides of pan and lightly grease.
2. For chocolate layer, whisk together 2 tablespoons milk alternative and egg replacer in a small bowl, until frothy.
3. In bowl of a stand mixer fitted with paddle attachment, whisk together flour blend, sugar, cocoa powder, baking soda, baking powder, salt and xanthan gum.
4. Add remaining ½ cup + 2 tablespoons milk alternative, warm water, oil, vanilla and egg replacer and beat on medium-low speed until smooth, about 2 minutes, scraping down sides of bowl as needed.
5. Transfer batter to foil-lined pan. Bake 25 minutes.
6. For cherry cheesecake layer, whisk together milk alternative and egg replacer in a small bowl, until frothy.
7. In bowl of a stand mixer fitted with paddle attachment, beat cream cheese alternative and shortening on medium speed until smooth. Mix in sugar and flour. Add egg replacer and vanilla and beat on medium speed until creamy and slightly fluffy.
8. When chocolate layer has baked 25 minutes, remove from oven and immediately spoon cheesecake mixture and cherry pie filling over top, alternating heaping tablespoons of each in a checkerboard pattern. Use a spoon to swirl together until marbled, leaving a little chocolate visible around edge of cake.
8. Bake 35 minutes, until chocolate layer starts to pull away from pan sides and filling edges are puffed and set. The center will still jiggle slightly.
9. Let cool completely on a wire rack. Transfer to refrigerator and chill at least 4 hours.
10. Grab edges of foil on both sides and lift cake out of pan. Cut into squares, wiping the knife blade clean after each cut. Transfer squares to individual cupcake liners.
11. For chocolate drizzle, place chocolate chips and shortening in a small microwave safe bowl and microwave on high 30 seconds. Vigorously stir. If not melted, microwave on high 30 seconds. Vigorously stir until smooth. Drizzle over squares and let stand 5 minutes. Serve immediately or store tightly covered in refrigerator up to 3 days or freeze up to 3 months.
Allergy-Friendly Chocolate Cherry Cheesecake Squares © 2014 by Cybele Pascal
This recipe first appeared in the Fall 2014 issue of Allergic Living Magazine